Watch Youtube Video (HINDI) :
Install PostgreSQL Ubuntu 20.04 With pgAdmin4; Do you know ?, pgAdmin is an Open-source database software project for the store large collected data and administration and management of the PostgreSQL database server.
pgAdmin4 included a graphical user interface and SQL query tool to execute and filter database data from the server. The pgAdmin is a procedural code debugger data collected and many other tools helpful. So this is all the guide we will take during the installation PostgreSQL database with pgAdmin 4 on Ubuntu Linux.
Postgres as compared to other databases is a little fast and more secure database, it will help us to store large users data and fast response service.
1. Install and Configure PostgreSQL Database Server
Use the below command to import the repository PGP sign key for the PostgreSQL Database.
$ wget --quiet -O - https://www.postgresql.org/media/keys/ACCC4CF8.asc | sudo apt-key add -
Now, Add the APT repository to the PostgresSQL.
$ sudo sh -c 'echo "deb http://apt.postgresql.org/pub/repos/apt/ `lsb_release -cs`-pgdg main" >> /etc/apt/sources.list.d/pgdg.list'
Install the PostgreSQL database server using provided command.
$ sudo apt install postgresql-12 postgresql-client-12 -y
How To Install MongoDB In Ubuntu
Enable the PostgresSQL database server to start automatically on a reboot.
$ sudo systemctl enable postgresql
Now, Start the database server.
$ sudo systemctl start postgresql
Change the default password to the PostgreSQL database.
$ sudo passwd postgres
To getting switch to the postgres user.
$ su - postgres
Create a new database named pgadmin.
$ createuser pgadmin
Login into the Postgres instance using the command.
$ psql
Set a new secure password to the pgadmin by changing the value of your_new_password
ALTER USER pgadmin WITH ENCRYPTED password 'your_new_password';
Create a new database named with testdb under owner of user pgadmin.
CREATE DATABASE testdb OWNER pgadmin;
Will grat all the privileges on the testdb database under the pgadmin user.
GRANT ALL PRIVILEGES ON DATABASE testdb to pgadmin;
Use to get existing PostgresSQL instance.
\q
Return to non-root to main root sudo user account.
$ exit
2. Change PostgreSQL Configurations
In this setup default PostgreSQL config only allows us a connection to the localhost (127.0.0.1). We need to edit the config in the files postgresql.conf and also pg_hba.conf to allow remote connection with our server. these both files are located in the /etc/postgresql/*/main directory folder.
Now, Open file postgresql.conf.
$ sudo nano /etc/postgresql/*/main/postgresql.conf
Find below the given line in the file.
#listen_addresses = 'localhost'
To listen, to all remote IP addresses, change the line to the below code and save your file. You can give specific remote IP addresses also.
listen_addresses = '*'
Open the file pg_hba.conf.
$ sudo nano /etc/postgresql/*/main/pg_hba.conf
Go to the end of the file and add the following lines and save the file.
host    all             all              0.0.0.0/0              md5
host    all             all              ::/0                   md5
Will restart PostgreSQL Database Server to sure the exists setup config are saved.
$ sudo service postgresql restart
3. Install pgAdmin 4
Now we will install all the required dependencies for the pgAdmin 4 for the installation.
$ sudo apt-get install curl gnupg2 -y
Import the repository PGP sign key for pgAdmin.
$ sudo curl https://www.pgadmin.org/static/packages_pgadmin_org.pub | sudo apt-key add
Adding pgAdmin 4 APT repository.
$ sudo sh -c 'echo "deb https://ftp.postgresql.org/pub/pgadmin/pgadmin4/apt/$(lsb_release -cs) pgadmin4 main" > /etc/apt/sources.list.d/pgadmin4.list && apt-get update --allow-insecure-repositories'
Now, we will install the web-based version of the pgAdmin 4 tool for your server platform.
$ sudo apt install pgadmin4-web -y
Will config the web mode. You will be required to enter an email address and password for late login in your pgAdmin 4 login.
$ sudo /usr/pgadmin4/bin/setup-web.sh
Allow HTTP or HTTPS traffic depending on whether you're using SSL or not. Select base on your requirement.
$ sudo ufw allow http
$ sudo ufw allow https
After the installation and setting up all the things according to the above guidelines open your browser and go to the given URL.
http://{YOUR_IP_ADDRESS}/pgadmin4
https://{YOUR_IP_ADDRESS}/pgadmin4
4. Connect to Database Server on pgAdmin 4
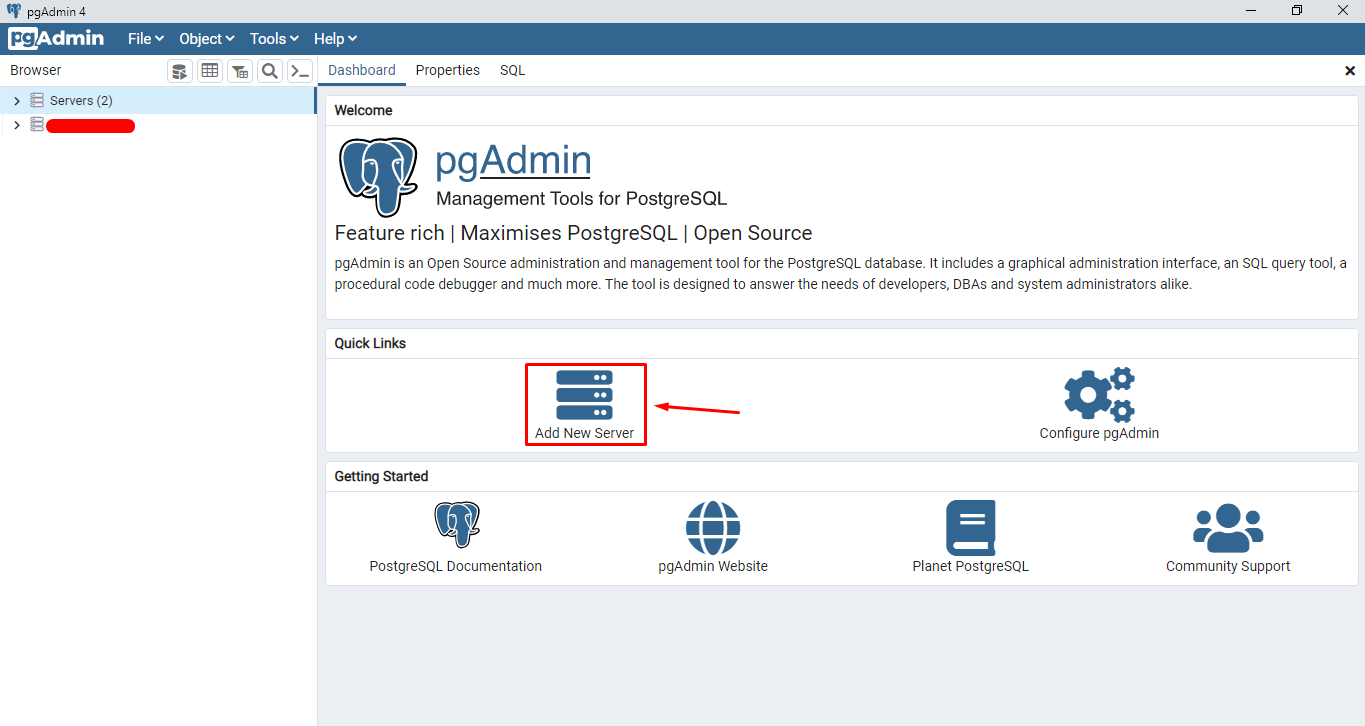
Once you open it, you will see an interface like the below given, click on the Add New Server option.

In the generate information enter your server name.

GO to the connection menu option, and add your server IP address or domain name, give your port and username as well as the database with the earliest given password.
Allow Port : Allow You 5432 port to your instance else willl throu you error connection timeout. Click below given link and allow instance port Error :unable to connect to server connection to the server at port 5432 failed timeout expired.

We always thanks to you for reading our blogs.

Dharmesh Chauhan
(Swapinfoway Founder)Hello Sir, We are brothers origin from Gujarat India, Fullstack developers working together since 2016. We have lots of skills in web development in different technologies here I mention PHP, Laravel, Javascript, Vuejs, Ajax, API, Payment Gateway Integration, Database, HTML5, CSS3, and Server Administration. So you need our service Please Contact Us

Haresh Chauhan
(Co-Founder)We Are Also Recommending You :
- How To Improve SQL Query Performance
- ERROR: database "laravel" is being accessed by other users DETAIL: There is 1 other session using the database.
- cPanel Cron Job Example With Demo
- Create Database In MYSQL Using PHP Script Example
- Error :unable to connect to server connection to the server at port 5432 failed timeout expired
- Laravel 6 installation with MongoDB Database
- Command SSH key generate in ubuntu server
- How To Install MongoDB In Ubuntu
- How to See Pgsql Database List in Ubuntu
- Creating Droplets Digitalocean With phpMyadmin
