
How to upload file in google drive laravel 9, Google Drive File Upload Tutorial Laravel 9 Using google drive api generate access token and upload file on google drive with authentication example.
Laravel PHP engaged folder and upload file to google drive using google access token in this tutorial laravel PHP tutorial example, In this tutorial, I will tell you how to upload the file on google drive with the help of Google Drive API.
Upload file utilize of google drive API will generate an access token and through this access token I will make authentication with google drive and then I will upload the file to google drive with the help of the access token. This access token allows me to access my google drive account and while using account access I will upload files to google drive very easily.
At the initial time made the request only, google drive provide a refresh token but obtain and access this token offline you have to access it offline like the below given.
$this->gClient->setAccessType("offline");
$this->gClient->setApprovalPrompt("force");
In this article ahead I will create a user and then I will generate an access token and in this token, I will update to a created user database column.
Here below you can see I have uploaded a folder "Webappfix" in this folder all the files will upload which I will send from here.
OUTPUT PREVIEW :

So let's start to integrate the google drive file upload tutorial with the new fresh clone laravel 9 projects.
Step 1: Create Project
Create laravel 9 projects using the given suggested below command in your terminal. This will take a little time to create a laravel project in your system. This command default will take the current version of the laravel.
composer create-project --prefer-dist laravel/laravel GoogleDriveLaravel

cd /GoogleDriveLaravel
Step 2: Database Configuration
After Successfully creating the laravel project we will config our database. First, I will go to my PHPMyAdmin and create a database.
Then we will put this database name in the .env, If not found the .env file in your root just copy form .env.example file and config.
.envDB_CONNECTION=mysql DB_HOST=127.0.0.1 DB_PORT=3306 DB_DATABASE=#database_name DB_USERNAME=#database_username DB_PASSWORD=#database_password
Step 3: Access Token Column Add User Table
Add a column access_token in users table. In this column, we will store access tokens. This access token will receive from google authentication. Once you run your route URL google popup will open and there you will enter your google account access it will return the access token. Update your user account table, specific user.
Middleware Example With Authentication Laravel 9
database/migrations/2014_10_12_000000_create_users_table.php<?php
use Illuminate\Database\Migrations\Migration;
use Illuminate\Database\Schema\Blueprint;
use Illuminate\Support\Facades\Schema;
class CreateUsersTable extends Migration
{
/**
* Run the migrations.
*
* @return void
*/
public function up()
{
Schema::create('users', function (Blueprint $table) {
$table->id();
$table->string('name');
$table->string('email')->unique();
$table->timestamp('email_verified_at')->nullable();
$table->text('access_token')->nullable(); // ADD THIS COLUMN
$table->string('password');
$table->rememberToken();
$table->timestamps();
});
}
/**
* Reverse the migrations.
*
* @return void
*/
public function down()
{
Schema::dropIfExists('users');
}
}
Step 4: Add Token Property Model
Add access_token column name in fillable array property in user model. If not then access is not able to update in your account.
app/Models/User.php<?php
namespace App\Models;
use Illuminate\Contracts\Auth\MustVerifyEmail;
use Illuminate\Database\Eloquent\Factories\HasFactory;
use Illuminate\Foundation\Auth\User as Authenticatable;
use Illuminate\Notifications\Notifiable;
use Laravel\Sanctum\HasApiTokens;
class User extends Authenticatable
{
use HasApiTokens, HasFactory, Notifiable;
/**
* The attributes that are mass assignable.
*
* @var array
*/
protected $fillable = [
'name',
'email',
'password',
'access_token' // ADD TOKEN PROPERTY HERE
];
/**
* The attributes that should be hidden for serialization.
*
* @var array
*/
protected $hidden = [
'password',
'remember_token',
];
/**
* The attributes that should be cast.
*
* @var array
*/
protected $casts = [
'email_verified_at' => 'datetime',
];
}
Now all migrate ready, just run below-suggested command in your project terminal. This command will migrate and create tables in your database.
php artisan migrate
Step 5: ApiClient Composer Install
Install google client API composer in your laravel application. Run the suggested command in your terminal. This command will install package composer for accessing google client API. This package also will help us to access google service drive too.
composer require google/apiclient
To handle the route method I will create a controller "GoogleDriveController" we will code all google drive authentication and file uploading coding in hid controller.
php artisan make:controller GoogleDriveController
Step 6: Routes
Define two routes in your web.php file you will find in the routes folder. Add these two routes to your router file. The first route for google authentication. The second route for file upload to google drive from the local system.
routes/web.php<?php
use Illuminate\Support\Facades\Route;
use App\Http\Controllers\GoogleDriveController;
/*
|--------------------------------------------------------------------------
| Web Routes
|--------------------------------------------------------------------------
|
| Here is where you can register web routes for your application. These
| routes are loaded by the RouteServiceProvider within a group which
| contains the "web" middleware group. Now create something great!
|
*/
Route::get('google/login',[GoogleDriveController::class,'googleLogin'])->name('google.login');
Route::get('google-drive/file-upload',[GoogleDriveController::class,'googleDriveFilePpload'])->name('google.drive.file.upload');
Step 7: GoogleDrive Controller
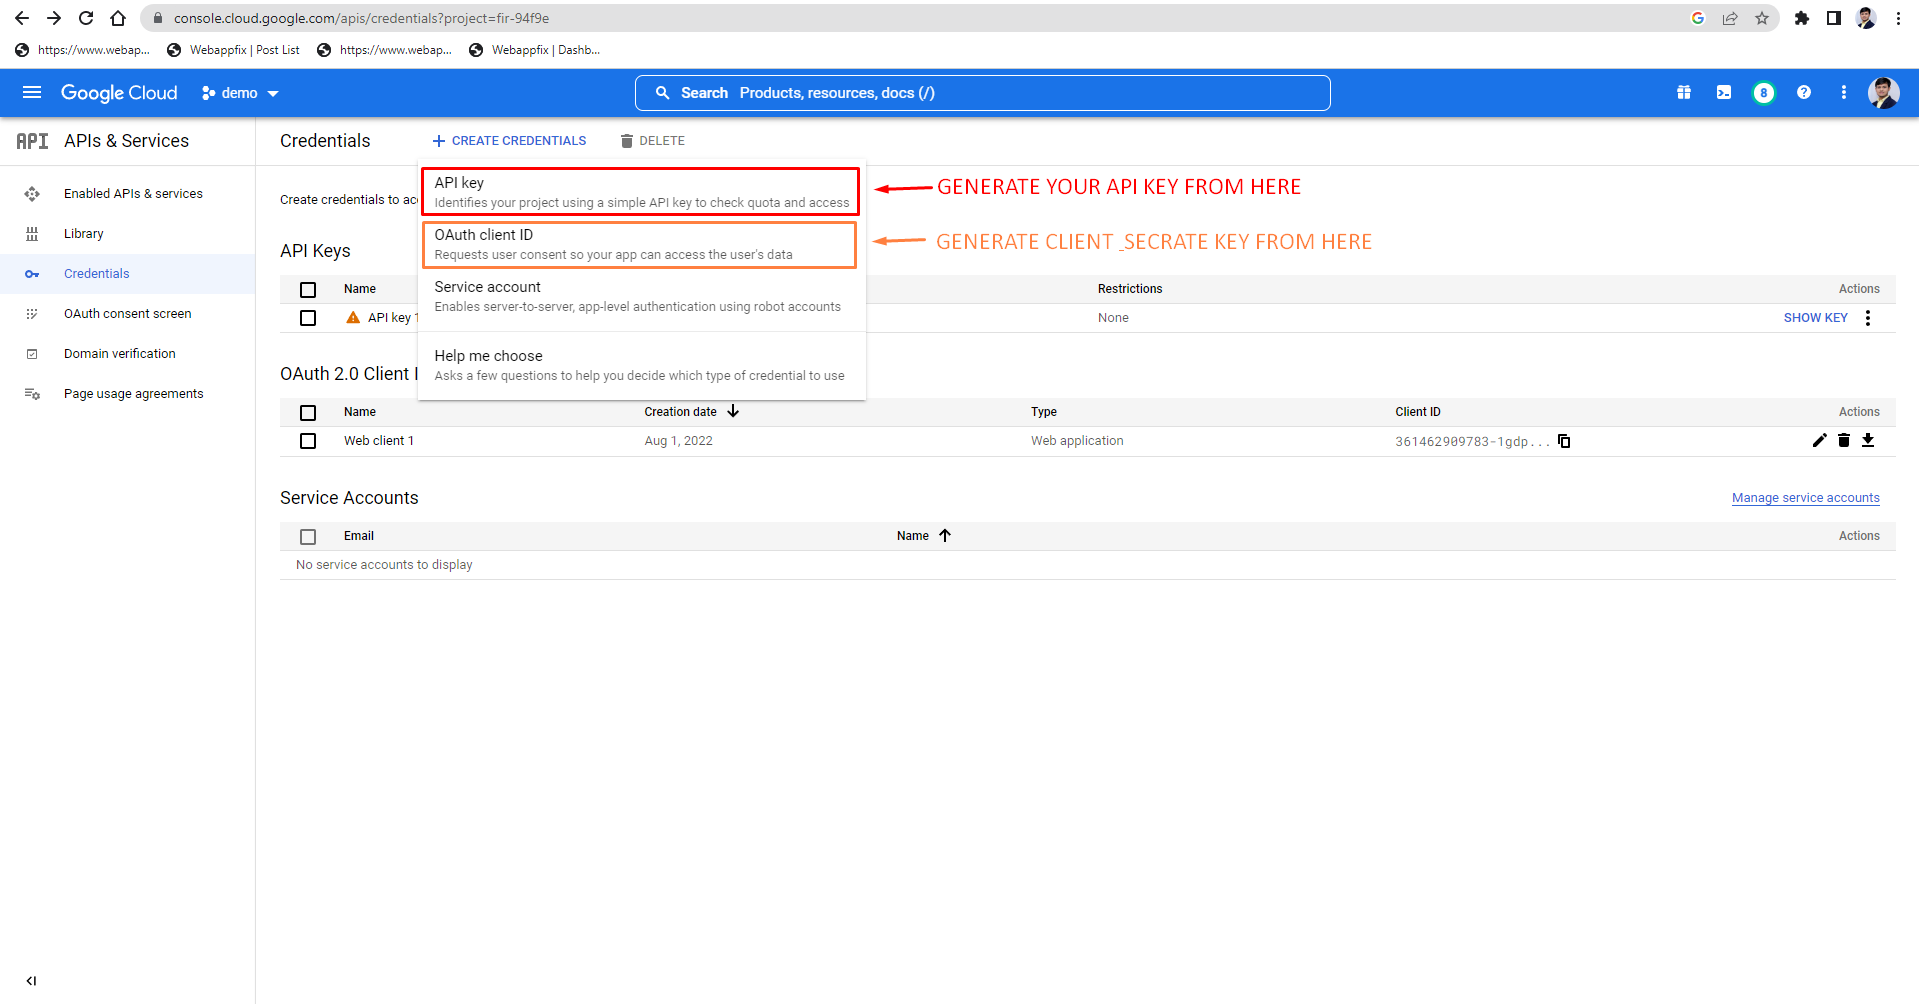
Goto "GOOGLE DEVELOPER" and generate your "API" key and "AUTH" client id and client secret id from there. First, create a project in the console and create credentials from there. You will get a JSON file and API key from there.
Here below the given image just go to the given URL and create a credential from there. This key will help us to google authentication and return us access token for a specific period then it will be expired.
Copy all GoogleDriveController code from the below code panel and paste it into your controller. Set all configuration in your controller "__construct" function.
app/Http/Controllers/GoogleDriveController.php<?php
namespace App\Http\Controllers;
use Illuminate\Http\Request;
use App\Models\User;
class GoogleDriveController extends Controller
{
public $gClient;
function __construct(){
$this->gClient = new \Google_Client();
$this->gClient->setApplicationName('YOUR APPLICATION NAME'); // ADD YOUR AUTH2 APPLICATION NAME (WHEN YOUR GENERATE SECRATE KEY)
$this->gClient->setClientId('YOUR CLIENT ID');
$this->gClient->setClientSecret('YOUR CLIENT SECRET ID');
$this->gClient->setRedirectUri('YOUR REDIRECT URL');
$this->gClient->setDeveloperKey('GOOGLE PROJECT API KEY');
$this->gClient->setScopes(array(
'https://www.googleapis.com/auth/drive.file',
'https://www.googleapis.com/auth/drive'
));
$this->gClient->setAccessType("offline");
$this->gClient->setApprovalPrompt("force");
}
public function googleLogin(Request $request) {
$google_oauthV2 = new \Google_Service_Oauth2($this->gClient);
if ($request->get('code')){
$this->gClient->authenticate($request->get('code'));
$request->session()->put('token', $this->gClient->getAccessToken());
}
if ($request->session()->get('token')){
$this->gClient->setAccessToken($request->session()->get('token'));
}
if ($this->gClient->getAccessToken()){
//FOR LOGGED IN USER, GET DETAILS FROM GOOGLE USING ACCES
$user = User::find(1);
$user->access_token = json_encode($request->session()->get('token'));
$user->save();
dd("Successfully authenticated");
} else{
// FOR GUEST USER, GET GOOGLE LOGIN URL
$authUrl = $this->gClient->createAuthUrl();
return redirect()->to($authUrl);
}
}
public function googleDriveFilePpload()
{
$service = new \Google_Service_Drive($this->gClient);
$user= User::find(1);
$this->gClient->setAccessToken(json_decode($user->access_token,true));
if ($this->gClient->isAccessTokenExpired()) {
// SAVE REFRESH TOKEN TO SOME VARIABLE
$refreshTokenSaved = $this->gClient->getRefreshToken();
// UPDATE ACCESS TOKEN
$this->gClient->fetchAccessTokenWithRefreshToken($refreshTokenSaved);
// PASS ACCESS TOKEN TO SOME VARIABLE
$updatedAccessToken = $this->gClient->getAccessToken();
// APPEND REFRESH TOKEN
$updatedAccessToken['refresh_token'] = $refreshTokenSaved;
// SET THE NEW ACCES TOKEN
$this->gClient->setAccessToken($updatedAccessToken);
$user->access_token=$updatedAccessToken;
$user->save();
}
$fileMetadata = new \Google_Service_Drive_DriveFile(array(
'name' => 'Webappfix', // ADD YOUR GOOGLE DRIVE FOLDER NAME
'mimeType' => 'application/vnd.google-apps.folder'));
$folder = $service->files->create($fileMetadata, array('fields' => 'id'));
printf("Folder ID: %s\n", $folder->id);
$file = new \Google_Service_Drive_DriveFile(array('name' => 'cdrfile.jpg','parents' => array($folder->id)));
$result = $service->files->create($file, array(
'data' => file_get_contents(public_path('Screenshot_1.png')), // ADD YOUR FILE PATH WHICH YOU WANT TO UPLOAD ON GOOGLE DRIVE
'mimeType' => 'application/octet-stream',
'uploadType' => 'media'
));
// GET URL OF UPLOADED FILE
$url='https://drive.google.com/open?id='.$result->id;
dd($result);
}
}
Step 8: Start Development Server
Start your development server, Press the below command in your terminal and start your project development server.
php artisa serve
Run the below URL in your project. This URL will open a google authentication popup. there enter your google account details and allow access to google drive. This will return you an access token from google for the google drive authentication.
You can see in your user's table in your database table you will see there, In access tokne_column a JSON format object that's token.
http://127.0.0.1:8000/google/login
Finally, Upload your file to google drive. Run the below URL in your web browser. Will return "Folder Id".
http://127.0.0.1:8000/google-drive/file-upload
CONCLUSION
This tutorial will help you to integrate the google drive file upload system into your laravel application. This is very easy and simple to integrate google drive into your project. Having given 8 steps in the tutorial each step is important. if you have already a project then you can skip the beginning step.
We always thanks to you for reading our blogs.

Dharmesh Chauhan
(Swapinfoway Founder)Hello Sir, We are brothers origin from Gujarat India, Fullstack developers working together since 2016. We have lots of skills in web development in different technologies here I mention PHP, Laravel, Javascript, Vuejs, Ajax, API, Payment Gateway Integration, Database, HTML5, CSS3, and Server Administration. So you need our service Please Contact Us

Haresh Chauhan
(Co-Founder)We Are Also Recommending You :
- How to Upload Multiple Images In Laravel 10
- All Guides About Soft Delete Laravel 8 And 9 With Examples
- Error : Array to string conversion Laravel
- How To Generate Image From HTML Using Snappy In Laravel 9
- groupBy() Method Laravel Collection Exmaple
- PhonePe Payment Gateway Integration in Laravel
- How to use Date Format Validation in Laravel?
- myfatoorah Payment Gateway Integration Laravel
- Laravel Email Send
- How To Filter/Search Single Column Multiple Id Stored Laravel