npm I @vue-stripe/vue-stripe using we will install stripe payment npm in our application, the after we will step ahead to integrate stripe payment integration in vuejs application one product checkout in our application.
How To Integrate Stripe Payment Gateway One-Time Product Checkout In Vuejs; in this chapter, we will integrate stripe payment gateway into our vue application. In this chapter a am starting from the clone of the new vuejs application and explaining your step-by-step process.
To integrate stripe payment checkout API integrate into vue js we also need to generate an API key and product key for making specific product payments via card. ahead in this tutorial also given guidelines to get a public API key and how to create an id from the stripe account.
So let's start integrating stripe payment once product checkout integration payment gateway in vuejs by cloning the new vuejs project skip the first step if you already created the project.
Step 1. Create New Project
Skip this step if you already install a vuejs project.
To get started first we will clone a new fresh vue js project, So I am creating a vuejs project and giving the "vue-stripe" name to this project. You just copy the below-given command and paste it into your project for creating a new project.
vue create vue-stripe
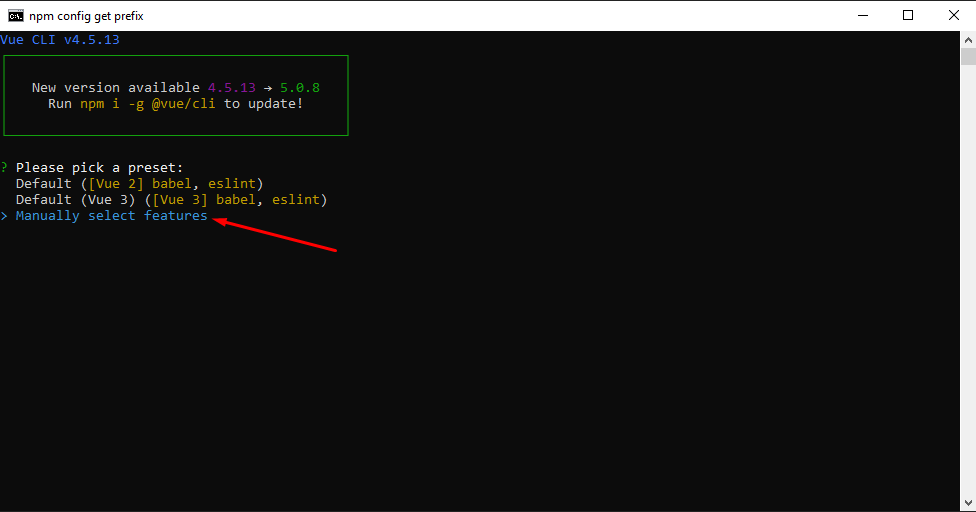
You need to select the manually selected feature project in your terminal after pasting the command in your terminal.

Once you selected the manual option for this project, choose the route option as below given example in your terminal. This will create a vue project with router system default in the application.

Step 2. Stripe Npm Install
To getting install stripe payment npm in our application we will use the below-provided command in the same project terminal. just copy and paste the given command into the application terminal.
How To Integrate Stripe Payment Gateway in Laravel 9
npm i @vue-stripe/vue-stripe
Step 3. Config Route
Copy all the below-provided code and paste it into your "router/index.js" file, after that we will create three components, here we already imported.
src/router/index.js
import Vue from 'vue'
import VueRouter from 'vue-router'
import Home from '../views/Home.vue'
import Success from '../views/Success.vue'
import ErrorPage from '../views/ErrorPage.vue'

Vue.use(VueRouter)

const routes = [{
        path: '/',
        name: 'Home',
        component: Home
    },
    {
        path: "/success",
        name: "Success",
        component: Success,
    },
    {
        path: "/error",
        name: "Error",
        component: ErrorPage,
    }
]

const router = new VueRouter({
    mode: 'history',
    base: process.env.BASE_URL,
    routes
})

export default router
Step 4. Home Component
After given routing in the application. we will create the Home. vue component in the views folder. and code something like the below given example. This code for the show stripe payment button by getting press button will redirect to the product payment page.
Also in this component add a success payment return URL from the payment gateway as well as a fail payment URL.
src/views/Home.vue
<template>
    <div>
        <stripe-checkout
        ref="checkoutRef"
        mode="payment"
        :pk="publishableKey"
        :line-items="lineItems"
        :success-url="successURL"
        :cancel-url="cancelURL"
        @loading="v => loading = v"
        />
        <button @click="submit">Pay now!</button>
    </div>
</template>

<script>
import { StripeCheckout } from '@vue-stripe/vue-stripe';
export default {
    name:"Home"
    components: {
        StripeCheckout,
    },

    data () {
        this.publishableKey = "##yourpublishablekey##";
        return {
        loading: false,
        lineItems: [{
            price: '##priceid##', // THE ID OF THE ONE-TIME PRICE YOU CREATED IN YOUR STRIPE DASHBOARD
            quantity: 1,
        }],
        successURL: 'http://localhost:8080/success',
        cancelURL: 'http://localhost:8080/error',
        };
    },

    methods: {
        submit () {
            // YOU WILL BE REDIRECTED TO STRIPE'S SECURE CHECKOUT PAGE
        this.$refs.checkoutRef.redirectToCheckout();
        },
    },
};
</script>
Step 5. Success Component
If your payment is made successfully, it will redirect to this success component.
src/views/Success.vue
<template>
    <h1>Payment Successful</h1>
</template>
<script>
export default {
    name:"Success"
}
</script>
Step 6. Error Component
If in case your payment failed then it will redirect to this Error component.
src/views/ErrorPage.vue
<template>
    <h1>Payment Failed</h1>
</template>
<script>
export default {
    name:"ErrorPage"
}
</script>
Step 7. App Component
The in-app component we will view our route based on the URL and component path from the router/index.js
src/App.vue
<template>
    <div class="main">
        <router-view></router-view>
    </div>
</template>
<script setup></script>

<style>
.main {
    max-width: 768px;
    margin: auto;
    margin-top: 100px;
}
</style>
Step 8. Config In Stripe
Configuration stripe payment dashboard, First you need signup using your credential in the strip payment. There is a developers option at the top of the page just click on that button and you will see your public and secret API keys there.

Create a product for which you want to do payment using API in vuejs, I just add a bag buy product in the product section.
Once you create your product you will get your product id, just copy and paste it into your Home component there is a product id key given.

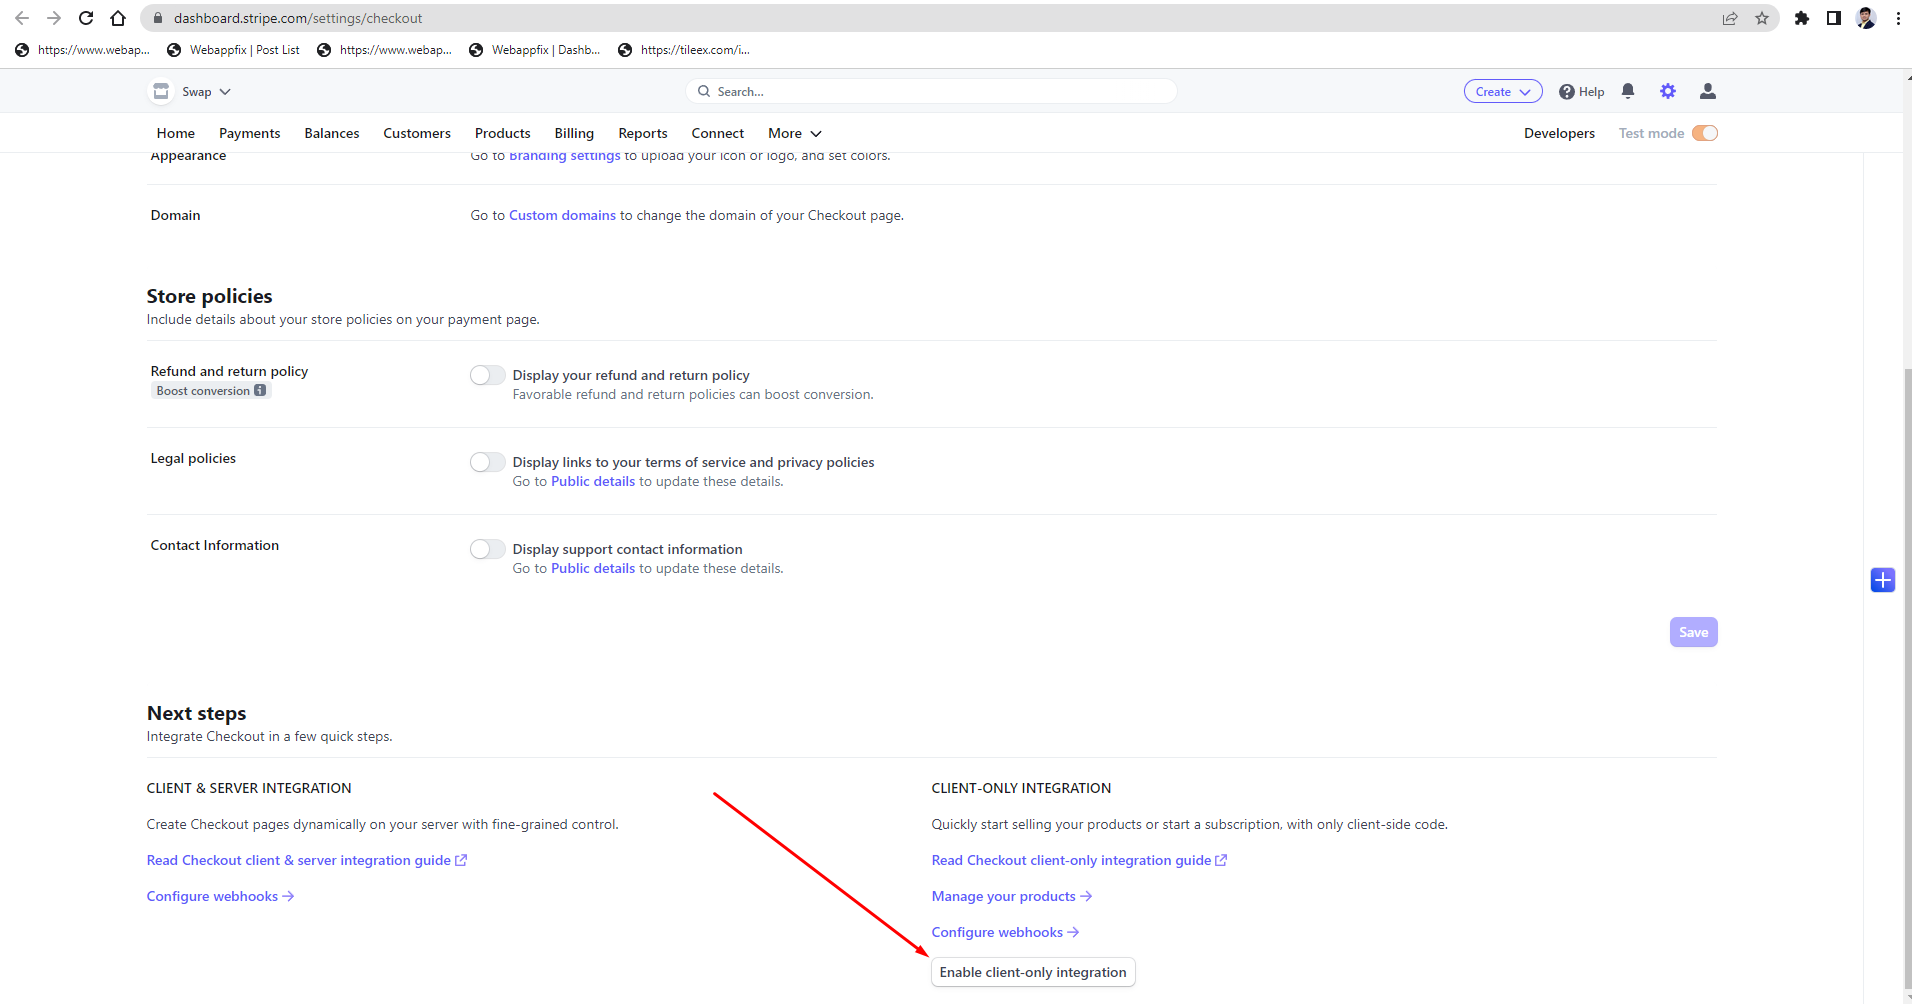
Enable the client-only integration option on the stripe checkout page.

now run your project using npm run serve and open in your browser.

Once you click on the pay button it will redirect to your creative product page. add your test card details and pay.

After making a test payment you can see in the stripe dashboard the given project with a successful payment made status.

After the successful payment is made you will redirect to the success page component base on the success URL given while you going to make the payment.

We always thanks to you for reading our blogs.

Dharmesh Chauhan
(Swapinfoway Founder)Hello Sir, We are brothers origin from Gujarat India, Fullstack developers working together since 2016. We have lots of skills in web development in different technologies here I mention PHP, Laravel, Javascript, Vuejs, Ajax, API, Payment Gateway Integration, Database, HTML5, CSS3, and Server Administration. So you need our service Please Contact Us

Haresh Chauhan
(Co-Founder)We Are Also Recommending You :
- Axios API Response Status Code Best way To Handle In Vue
- Simple Form Request Send VueJs Example
- How To Use Props In Vue.js
- How to Install Angular CLI
- jQuery Lazy Load
- Keep array input value from localstorage on page refresh
- VueJs Event Bus Example
- How to Add Bootstrap in Angular 8 | Install Bootstrap 4 in Angular 8
- How To Integrate Stripe Payment Gateway One Time Product Checkout In Vuejs - Javascript
- Vuejs form input binding with select box option
